
Ever found yourself in a bit of a pickle when your beloved orchid suddenly started sporting yellow leaves? I know I have. It’s like watching your favorite sitcom character donning a strange, out-of-character outfit. But fret not! Learning how to Save an Orchid with Yellow Leaves isn’t rocket science.
In the next few paragraphs, we’ll dive into the nitty-gritty of orchid care, specifically targeting those pesky yellow leaves. So buckle up and keep reading about ‘How to Save an Orchid with Yellow Leaves’.
Key Takeaways
- Yellow leaves on an orchid can be a sign of overwatering, under watering, or exposure to extreme temperatures.
- To save an orchid with yellow leaves, first identify the cause. Adjust watering habits if necessary; orchids typically need watering once a week.
- Move the plant to a location with indirect sunlight and temperatures between 60-75°F.
- If the yellowing persists, consider repotting the orchid in fresh orchid mix.
- Remove severely yellowed or dead leaves carefully to avoid damaging healthy parts.

Understanding Yellow Orchid Leaves
Yellow leaves on your beloved orchid can be a real bummer, right? It’s like watching your favorite character in a movie suddenly fall ill. But hey, don’t panic! This is just part of the orchid care journey. Just like humans, indoor orchids too have their ups and downs. And yellowing orchid leaves can be one of those down moments. But here’s the good news – understanding why this happens is the first step to save an orchid with yellow leaves.
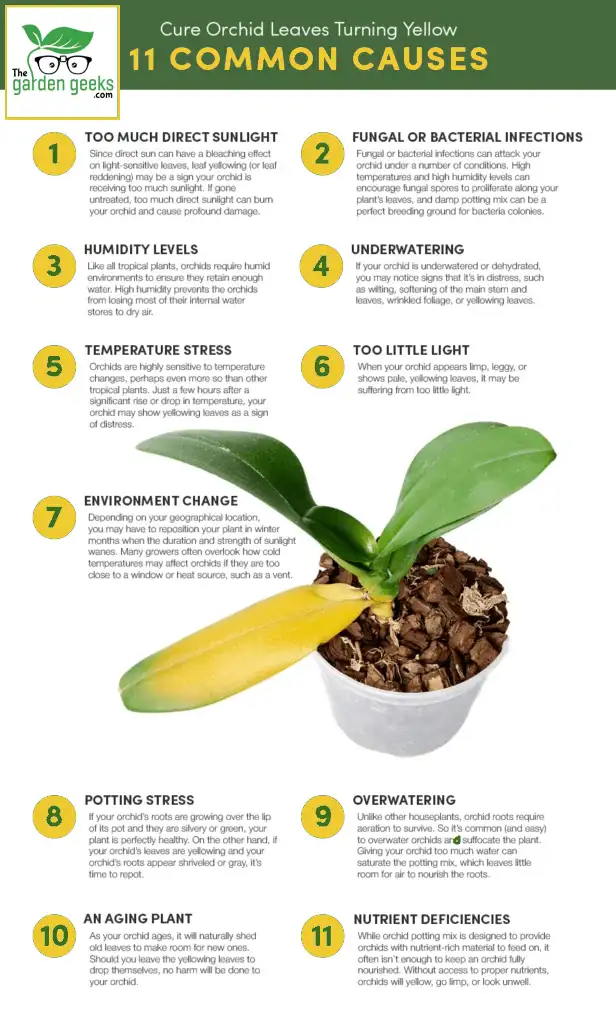
What Causes Orchid Leaves Turning Yellow?
So what’s behind these pesky yellow leaves? Well, it could be a number of things. Overwatering is often the prime suspect. Yes, you heard it right! Your love for your orchid might actually be drowning it. Too much water can lead to root rot which eventually manifests as yellow leaves.
But wait, there’s more! Insufficient light can also cause orchid yellow leaves. Imagine being stuck indoors all day without sunlight – you’d probably turn pale too! Similarly, nutrient deficiency or certain orchid diseases may also result in yellowing.
Why are my orchid leaves turning yellow?
Now here’s where things get interesting. Contrary to popular belief, yellow leaves don’t always mean your orchid is on its deathbed. Sometimes it’s just natural leaf aging – yes, even plants grow old!
In fact, healthy yellow leaves on orchids are quite common and nothing to worry about. So next time you see a yellow leaf, take a moment before you start panicking about normal vs abnormal leaf coloration.
Remember folks, not all that glitters is gold and not all that yellows is sick!
Diagnosing Orchid Yellow Leaves
To save an orchid with yellow leaves, it’s crucial to play detective. You’ve got to diagnose the problem, folks! This means assessing your orchid’s overall health and identifying any other sneaky symptoms. It’s like being a plant doctor, but without the white coat.
Assessing the Overall Health of Your Orchid
Now, let’s talk about how you can conduct a thorough orchid health check. Don’t just focus on those yellow leaves – there’s more to your orchid than its flashy foliage. Look at the roots, are they firm and white? That’s a good sign!
Next up, take a gander at the stem. Is it standing tall and proud? Great! A droopy stem might indicate trouble in paradise.
Finally, don’t forget to check out those blooms. If they’re vibrant and plentiful, you’re doing something right! Remember folks, evaluating orchid condition is all about looking at the big picture.
Identifying Specific Symptoms Besides Yellow Leaves
Alrighty then, moving on to identifying other potential issues that may be lurking in your orchid. Yes indeed, yellow leaves could be just the tip of the iceberg.
Are there spots or patches on your leaves? Could be a fungal infection. Yikes!
Is your orchid wilting despite regular watering? Might be root rot – another bummer.
And don’t ignore pests! Tiny bugs can cause big problems for our green friends.
So keep an eye out for these additional orchid issues because remember: knowledge is power when it comes to saving your precious plant from peril!
Common Issues and Their Solutions
When it comes to maintaining healthy orchids, a few common issues can lead to those dreaded yellow leaves on orchids. Don’t panic, though! Most of these common orchid problems are due to simple orchid care mistakes that can be easily corrected. Let’s dive into the solutions for these orchid issues.
Overwatering and Underwatering: Signs and Remedies
Ever heard the saying “too much of a good thing”? Well, it applies to watering your orchids too. Overwatering is one of the main culprits behind yellow leaves. The signs? Mushy roots and droopy, yellow leaves.
So how do you fix an overwatered orchid? Easy peasy! Just cut back on watering and ensure proper drainage. Now, underwatering is another beast altogether. If your orchid’s leaves are wrinkled or shriveled, you might be dealing with an underwatered plant.
The remedy for this is pretty straightforward – water more frequently! But remember, balance is key when correcting underwatered orchids.
Light Exposure: Too Much or Too Little?
Light exposure can be a tricky business when trying to save an Orchid with Yellow Leaves. Too much light can scorch your plant, causing its leaves to turn a nasty shade of yellow or even white.
On the other hand, insufficient light can also cause leaf yellowing (talk about being picky!). To determine if your plant is getting too much or too little light, pay attention to its leaf color. A healthy green means you’re in the clear!
Adjusting your orchid light requirements may involve moving your plant around until you find that sweet spot where it thrives best.
Nutrient Deficiency and How to Correct It
Nutrient deficiency is another common reason why those beautiful orchid leaves might be turning yellow. Orchids, like all plants, need a balanced diet to stay healthy.
If your orchid is lacking in essential nutrients, it will let you know by changing leaf color. To correct nutrient deficiency in orchids, consider using a balanced fertilizer designed for orchids. But remember, less is more when it comes to feeding these delicate beauties!
Step by Step Guide
| № | Action | Explanation | Additional Tips |
|---|---|---|---|
| 1 | Identify the Cause | Determine whether the yellowing is due to overwatering, under-watering, nutrient deficiency, or light issues. | Check the roots; healthy roots are firm and green. |
| 2 | Adjust Watering | If overwatered, allow the orchid to dry out before watering again. If underwatered, soak the orchid for 5-10 minutes. | Use room temperature water and ensure good drainage. |
| 3 | Provide Proper Lighting | Move the orchid to an area with indirect, bright light. Avoid direct sunlight which can scorch the leaves. | East-facing windows are ideal. |
| 4 | Check Temperature | Ensure your orchid is in a spot with a temperature between 60-75°F (15-24°C) during the day and slightly cooler at night. | Avoid placing your orchid near heating or cooling vents. |
| 5 | Fertilize Correctly | Use a balanced orchid fertilizer once a month, except when the plant is in full bloom. | Dilute the fertilizer to half the recommended strength. |
| 6 | Repot if Necessary | Consider repotting if the orchid is root-bound or the potting medium has degraded. | Use an orchid-specific potting mix and a pot with drainage holes. |
| 7 | Maintain Humidity | Orchids thrive in 40-70% humidity. | Place a humidity tray under the pot or use a room humidifier. |
| 8 | Prune Damaged Leaves | Carefully remove yellow or dead leaves using sterilized scissors or pruning shears. | This helps prevent the spread of potential diseases. |
| 9 | Monitor Progress | Keep an eye on your orchid’s recovery, adjusting care as needed based on the plant’s response. | Patience is key; recovery can take several weeks. |
Remember, every orchid is unique, and it may take time to find the perfect balance of care. If your orchid continues to struggle, seek advice from a local nursery or orchid society.
Preventive Measures for Healthy Orchids
In the quest to save an orchid with yellow leaves, it’s crucial to remember that prevention is better than cure. Keeping your orchid healthy and happy is all about proper care, which includes watering, light conditions, and feeding. Let’s dive into these orchid care tips.
Ideal Watering Practices for Orchids
Watering is a biggie when it comes to healthy orchid maintenance. Too much or too little can lead to those dreaded yellow leaves. The trick? It’s all about balance.
Orchids aren’t cacti, but they’re not water lilies either. They need just the right amount of water – not too dry, not too soggy. Overwatering can cause root rot, while under-watering can leave your plant dehydrated.
So how often should you water? Well, it depends on the type of orchid and its environment. But as a rule of thumb, once a week should do the trick. And remember: when in doubt, less is more!
Optimal Light Conditions for Orchids
Next up: lighting! Just like Goldilocks’ porridge, your orchid wants its light “just right”. Too much sun can scorch the leaves (hello yellow!), while too little can stunt growth.
The ideal scenario? Bright but indirect sunlight. Think east or north-facing windowsill rather than direct midday sun.
Indoor lighting can work too if natural light isn’t an option. Fluorescent lights are a good choice here – just make sure your orchid isn’t directly underneath them.
Proper Feeding: Choosing the Right Fertilizer
Last but definitely not least: feeding! A well-fed orchid is a happy orchid – and one less likely to develop yellow leaves.
Choosing the right fertilizer is key here. Look for one specifically designed for orchids, as these will have the right balance of nutrients.
Remember: over-fertilizing can be just as harmful as under-fertilizing. So follow the instructions on the packet to a T – your orchid will thank you!

To Wrap Up
Think of your orchid as a drama queen at a party – it won’t leave without making its presence felt! If it’s flashing you with yellow leaves, it’s time to step up and take action.
Don’t be the wallflower in this plant-human relationship. Dive into our guide on how to Save an Orchid with Yellow Leaves and keep that green thumb shining!