
Did you know that rosemary, a beloved aromatic herb, is not grown from seeds but propagated from cuttings? Yes, that’s right! You can multiply your favorite rosemary plant without buying new ones. The process of How to Propagate Rosemary From Cuttings is both economical and rewarding.
Propagating rosemary from cuttings allows you to clone the parent plant, ensuring the same taste and aroma you love. It’s like creating an identical twin of your favorite plant! Plus, it’s a fun gardening project that even beginners can undertake with great success.
So let’s dive into this exciting world of plant propagation. Keep reading about ‘How to Propagate Rosemary From Cuttings’ – we promise it’ll be worth your while!
Quick Answer
- Propagate Rosemary by selecting a healthy, non-flowering stem from an existing plant.
- Cut about 5-6 inches off the stem, remove the lower leaves, and dip the cut end in rooting hormone.
- Plant the cutting in a pot filled with well-draining soil mix, and keep it in a warm, bright spot.
- Water regularly but don’t overwater. It should root within 6 weeks.
- Care for your new rosemary plants by gradually introducing them to direct sunlight and watering when the top inch of soil is dry.

What is Rosemary Propagation?
Definition and Overview
Rosemary propagation is like making a clone army of your favorite herb, but way cooler and totally legal. It’s when you take a piece of an existing rosemary plant and make it grow into a new one. Imagine cutting off a lizard’s tail, and the tail grows into a new lizard. That’s rosemary propagation, but with plants. This trick lets gardeners create more plants without buying seeds or new ones from the store.
Understanding how rosemary grows through propagation is crucial for any green thumb wanting to expand their herb garden without extra cost. It’s all about taking a snippet here, planting it there, and boom – more rosemary! This method is super important because it ensures you have a never-ending supply of this aromatic herb for cooking, medicinal uses, or just making your garden look pretty.
Benefits of Propagating Rosemary
Propagating rosemary comes with some awesome perks. First off, it’s like hitting the jackpot in cost-effective gardening. Why spend money on new plants when you can make more from what you already have? It’s basically free plants for life!
Another cool benefit is ending up with healthier plants. By choosing the strongest and healthiest parts of the plant to propagate, you’re ensuring that your future rosemary plants are the best of the bunch. It’s like picking only the top athletes for your team; you know they’re going to perform well.
Lastly, there’s something super satisfying about watching tiny cuttings grow into full-blown plants. It feels like magic but it’s actually science (and a bit of patience). Plus, having more rosemary around means more delicious food on your table and a lovely scented garden. Who wouldn’t want that?
When is the Best Time to Propagate Rosemary?
Finding the best time to propagate rosemary can feel like a secret garden mystery. But don’t worry, it’s not as complicated as it seems.
Seasonal Considerations
When you’re looking to propagate rosemary, timing is everything. Spring and early summer are your golden tickets. This period offers the perfect mix of warmth and sunlight that rosemary cuttings love. It’s like giving them a cozy blanket and a good book; they’ll just thrive.
But why spring and early summer? Well, during these seasons, the plant is in its active growth phase. It’s like rosemary is waking up from a long nap, stretching out its leaves, and saying, “Hey, I’m ready to grow!” This makes it easier for new cuttings to take root and start their own journey.
Now, let’s talk about the seasons that are more like party poopers for our green friends. Late fall through winter is a no-go zone for propagation. The cold can make rosemary cuttings sulk instead of sprout. They’re less likely to root because they’re too busy trying to keep warm.
So, remember: when nature starts blooming and buzzing with life in spring and early summer, it’s your cue. That’s when you grab your gardening gloves and get to propagating!
Ideal Climatic Conditions for Propagation
Rosemary doesn’t ask for much but give it what it wants, and you’ll be rewarded with lush growth. Aim for a sweet spot temperature range between 65°F (18°C) and 75°F (24°C). It’s like setting up the perfect room temperature – not too hot, not too cold.
Humidity plays a role too but think Goldilocks – just right. Too much moisture could lead to soggy soil conditions which our herb isn’t fond of. On the flip side, air drier than a desert won’t do either. A balance keeps the cutting happy while it develops roots.
Light requirements? Bright but indirect light is your best bet. Imagine reading a book by the window on a sunny day without getting blinded by direct sunlight; that’s what your rosemary cutting needs – gentle yet sufficient light.
Remember though, every garden or home environment is unique. You might need to play around with these conditions slightly to find what works best in your space. But stick within these guidelines, and you’re on track for successful propagation!
Selecting and Preparing Rosemary Cuttings
Getting your hands on the right rosemary cuttings is like picking the best piece of cake. It’s all about knowing what to look for and getting them ready for their big growth spurt.
How to Choose Healthy Stem Cuttings
When hunting for the perfect rosemary stem selection, think of it as choosing a superhero team. You want only the best. Look for stems that are vibrant green, not too woody or too soft. These guys should feel firm and look lively, without any brown spots or signs of disease.
The ideal candidates are young but not newborns, with a couple of inches of growth to show they’ve got what it takes. This stage is crucial because it means they’re ready to face the world on their own but still have plenty of growing left to do.
Remember, you’re looking for healthy plant stems that can stand up straight without any support. If they’re leaning or look tired, leave them be. They won’t make good teammates in your propagation journey.
Lastly, check the leaves. They should be full of life, a deep green color, and attached firmly to the stem. Leaves that are yellowing or falling off are red flags. Your chosen cuttings should pass these tests with flying colors.
Preparing the Cuttings for Planting
Once you’ve picked your champions, it’s time to get them battle-ready. Start by giving them a little haircut. Trim off the lower leaves so you have a nice clean stem at the bottom; this is where roots will sprout.
Next up is a dip in some rooting hormone magic dust. This step isn’t a must-do, but think of it as giving your cuttings a superpower boost—it helps encourage root growth faster.
After their spa treatment, let them rest for a bit before planting. This downtime helps the cuttings heal from their trim and get ready to grow new roots.
Make sure each cutting has its space when you plant them—crowding can lead to drama nobody wants in their garden party.
By following these steps carefully, you’re setting up your rosemary cuttings for success in their new homes!
How to Propagate Rosemary From Cuttings
In this part of the article, we’re going to walk through the magical process of turning a single sprig of rosemary into your very own rosemary bush. It’s like cloning, but for plants, and totally legal. Let’s get our green thumbs ready and dive into the step-by-step guide on how to propagate rosemary from cuttings.
-
Choose a healthy mother plant: First things first, you need a rosemary plant that looks like it’s thriving, not just surviving. Look for one with fresh, green stems and plenty of growth. This is your gold mine for cuttings.
-
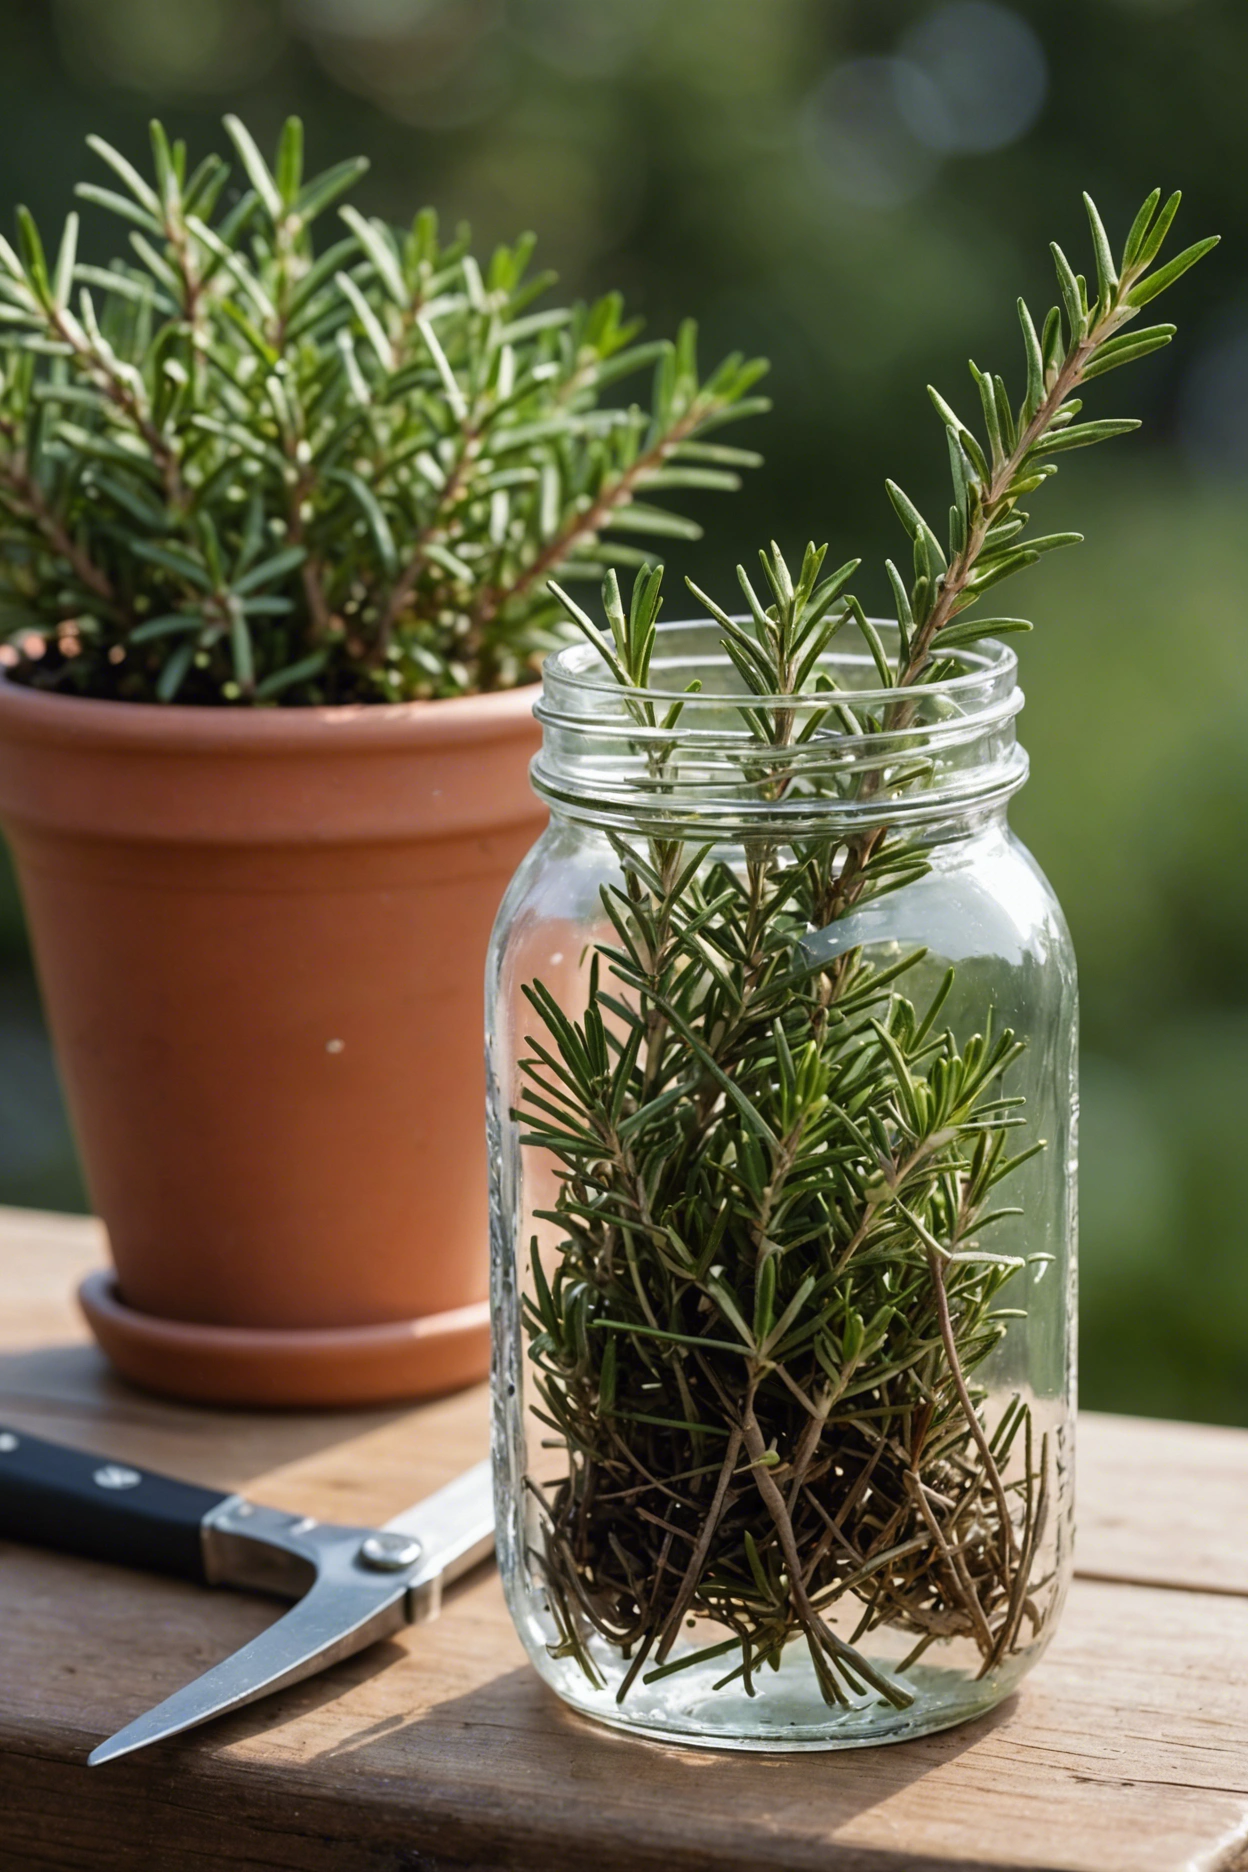
Snip your cutting: With a clean pair of scissors or gardening shears, cut a 4-6 inch piece from the new growth of your chosen rosemary plant. New growth is softer and greener than the woody parts. Aim for a morning snip when the plant is full of moisture.
-
Prepare your cutting: Strip off the leaves from the bottom two-thirds of the stem you just cut. It might feel wrong to strip it almost bare, but trust me, this is key! Those bare spots are where your new roots will sprout.
-
Dip in rooting hormone (optional): This step is like giving your cutting a little pep talk before the big game. Dipping the end in rooting hormone can help stimulate root growth, but it’s not a deal-breaker if you skip it.
-
Plant in potting mix: Grab a pot filled with moist potting mix or soil specifically designed for cuttings (something with perlite is great). Stick your prepared cutting about an inch deep into the soil. You can fit several cuttings in one pot, just keep them spaced out so they don’t have to fight over space when their roots start growing.
-
Create a greenhouse effect: To keep humidity high around your cutting, cover the pot with clear plastic or place it inside a plastic bag with some holes poked for air circulation. Think of it as creating a mini spa for your cutting where it can relax and start growing roots without drying out.
-
Place in indirect light: Find a spot that gets plenty of light but not direct sunlight which can be too harsh for your baby rosemary and dry it out faster than you can say “herb garden”.
-
Keep soil moist: Water lightly whenever the top layer of soil feels dry to touch but avoid making it soggy – think damp sponge rather than wet towel.
-
Be patient: After about 2-4 weeks, give your cutting a gentle tug to see if there’s resistance from root formation. If there’s resistance – congratulations! You’ve successfully propagated rosemary! If not, give it more time and keep up with care.
Caring for Your New Rosemary Plants
After you’ve successfully propagated your rosemary, the real fun begins. It’s time to ensure these little plants thrive. Proper care is crucial from this point forward.
Initial Care Post-Propagation
Caring for new cuttings starts with the right environment. Keep them in a spot that gets plenty of indirect sunlight. Too much direct sun can stress them out before they’re ready.
Watering is next on the list. Your new rosemary doesn’t like wet feet, so let the soil dry out a bit between waterings. But don’t let it turn into a desert either!
In the first few weeks, watch your plants like a hawk for signs of growth or distress. New growth means you’re on the right track. Yellowing leaves? You might be overdoing it with water.
Remember, patience is key during this stage. Your rosemary plant care routine now sets the stage for healthy development later on.
Long-Term Maintenance Tips
Once your rosemary plants are established, they’ll need less babysitting but still appreciate attention. Regular watering when the soil feels dry to the touch is a good rule of thumb.
Rosemary loves sunlight, so make sure they get lots of it throughout the day. A sunny window or a spot in your garden that catches full sun is ideal.
Pruning isn’t just for looks; it encourages bushier growth and prevents your plant from getting leggy and sparse. Snip off any woody stems or dead parts to keep your plant happy and healthy.
Lastly, think about feeding your rosemary every so often with a balanced fertilizer, especially if you notice slow growth or pale leaves. Just don’t overdo it—too much love can be just as bad as too little!
Following these steps will help ensure your propagated rosemary plants grow strong and provide you with fresh herbs for years to come.
Common Challenges in Propagating Rosemary
Propagating rosemary might seem like a piece of cake, but sometimes, it’s more like baking the cake without a recipe. You’re excited to grow your own herbs, but then boom! You hit some roadblocks. Let’s talk about those tricky parts that might have you scratching your head and wondering where you went wrong.
-
Rooting takes forever: Sometimes, it feels like you could watch paint dry faster than waiting for rosemary cuttings to root. Patience is key here. It can take a few weeks, so don’t give up too soon.
-
Cuttings turning brown: If your rosemary cuttings start turning brown or mushy at the base, it’s usually a sign of too much water. Yes, they need moisture to root, but too much of a good thing is bad here. Let the soil dry out a bit between waterings.
-
Leaves drying out or wilting: This one’s tricky because it could mean your cutting needs more water or less sun. Try moving it to a spot with indirect sunlight and check if the soil is consistently moist without being soggy.
-
No roots forming: If it seems like an eternity has passed and there’s still no sign of roots, consider the possibility that your cutting wasn’t ideal from the start. Make sure you’re using healthy, non-flowering stems for best results.
-
Mold growth on cuttings or soil: Seeing fuzzy stuff? That’s mold, and it means there’s too much humidity around your cuttings. Improve air circulation around them and reduce watering frequency to combat this issue.
Remember, propagating rosemary is an adventure with its ups and downs. Keep these challenges in mind, and don’t get discouraged; even seasoned gardeners face them!
Troubleshooting Poor Growth and Other Issues
| Issue | Possible Cause | Solution |
|---|---|---|
| Yellowing leaves | Overwatering or poor drainage | Reduce watering frequency, ensure pot has good drainage |
| Wilted or drooping leaves | Underwatering | Water more frequently, but do not overwater |
| Slow growth | Lack of sunlight or nutrients | Move to a sunnier location, add a slow-release fertilizer |
| Brown spots on leaves | Fungal disease (often due to overwatering) | Remove affected leaves, reduce watering, consider using a fungicide |
| No new growth after planting cutting | Cutting was not viable or is diseased | Try again with a new cutting, ensuring it is healthy and from a non-flowering stem |
| Leaves falling off | Too much heat or cold stress | Move plant to an area with more moderate temperatures |
| Plant death after transplanting | Transplant shock | Water thoroughly after transplanting, keep in partial shade for a few days before moving to full sun. |
To Wrap Up
So, you’ve learned How to Propagate Rosemary From Cuttings and it’s not as hard as you thought, right? You’re now ready to make more rosemary plants from just a few cuttings. Remember, the key steps are to choose healthy stems, make clean cuts, remove lower leaves and plant them in well-draining soil.
Don’t forget patience is your best friend here. It can take a few weeks for the roots to grow but trust me, seeing those little roots will be worth the wait!
Finally, remember that practice makes perfect. So don’t be disheartened if your first few attempts aren’t successful. Keep trying and soon you’ll have plenty of rosemary plants to enjoy or share with friends. Happy propagating!

FAQs about ‘How to Propagate Rosemary From Cuttings (With Photos)’.
Can I propagate rosemary at any time of the year?
While you can technically try propagating rosemary at any time, the best results are usually achieved in spring and early summer when the plant is actively growing.
How long does it take for rosemary cuttings to root?
Rosemary cuttings typically take between 2-4 weeks to develop roots. However, this could vary depending on factors like temperature, humidity, and cutting health.
Do I need a special type of soil for propagating rosemary?
A well-draining soil mix is ideal for propagating rosemary. You can use a standard potting mix combined with a bit of sand or perlite to improve drainage.
Why are my rosemary cuttings dying?
There could be several reasons why your cuttings are dying – overwatering, poor light conditions, or disease. It’s important to provide proper care and monitor their health regularly.
Can I use rooting hormone for propagating rosemary?
Yes, using a rooting hormone can help stimulate root growth in your rosemary cuttings. However, it’s not strictly necessary as rosemary can also root without it.
How often should I water my newly propagated rosemary plants?
Newly propagated plants need consistent moisture but avoid overwatering. Water whenever the top inch of soil feels dry to touch.
What kind of container should I use for propagation?
You can use any container that has good drainage. Plastic pots or recycled containers with holes punched in the bottom work well.